Its my final week for the Crazy 4 Challenges blog and this weeks theme is DOWN UNDER - Frances who kindly asked me to join lives in Australia and the reason she chose DOWN UNDER was as it was Australia Day the other day. Of course we could have chosen anything DOWN UNDER, weather that be Australian or simply DOWN UNDER in another way. I chose down under the sea ;)
I have used a bunch of different things and I will list these below :
For the main card I used KAREN BURNISTON OVAL PULL CACRD
Karen Burniston's ROCKY THE CRAB
Elizabeth Crafts LEAF AND BERRY BRANCHES
Fish TAYLORED EXPRESSIONS
All items apart from Paper from Crafts U Love.
Really enjoyed being part of the challenge team for this month, but I really do not know how they do it continually. Hats off to you ladies, you do an awesome job!
Here is the link so you can see what the other ladies have made this month.
Hi Crafters, Me again and this week's Crazy 4 Challenges challenge is "Pop". Again we can interpret it how we wish and I almost use this Changito stamp from Stampendous for the Bubbles challenge but decided to go with the Penny Black mice and when I saw the challenge was called POP I realised that this could work for this week too. Apparently the 19th January was National Popcorn Day, so let's add some 'POP' to our cards be it by creating a card that includes the theme popcorn; creating a Pop Up Card; just Popping up your image using foam tape or just adding a Pop of color to a black & white card.
I teamed the Changito stamp with KATIE LABEL PIVOT die from Karen Burniston
and the NEW RIBBONS 1 from Els Van De Burgt and Elizabeth Craft Designs.
The lovely paper was an old peice that I found in my stash and with all those circles
I thought they went well with the bubbles that Changito was blowing.
Simple sentiment Have a fun day was made using stamps from Marianne Designs.
All items from Crafts U Love apart from Changito stamps and paper which are older designs.
Check out the Crazy 4 Challenges blog HERE to see what the ladies in the group
have made. Almost the end of me with the C4C group and I have loved being part of the group for this past month.
Hi Friends I am back with DAY 2 of the designer challenge and this time I have used the HANGING CHARM PULL TAB die to make this pretty heart card. Another ingenious design from Karen that makes a WOW card and its the dies that do the hard work, you just have to choose what papers to use and how to decorate. Karen has a great video here for you to look at.
Here is the front of the card. lots of details here.
I have used Karen's New FLOWER STENCIL and paste for the front, along with the
PULL CARD EDGES scallop die to make the ric rac.
Now I will let you into a little secret and I don't know about you but I am terrible
at pointing out the imperfections on my cards. But the last step was for me to
stick the pull card part onto the base card. OPPS it was wonky... argh what to do, what to do.So I drew some purposely wiggly lines around the top and bottom that do a really good job in detracting from the centre part being slightly off. PHEW
Here is the pull card in all its pull card glory!! WOW! See I told you, a real WOW! card
and you can do that with these dies too :)
A bit closer and you can see the stencil also the stamp from the
"Just a note" clear stamps.
The Stencils are new to Karen Burniston and great fun to use.
All materials are available from Elizabeth Craft Designs in the USA
or Crafts U Love in the UK.
Check out the links on the left hand side for all my talented DT friends.
Karen will be posting her blog post on Wednesday so check out her blog then.
This months challenge and a great theme being NEW. As you know Karen Burniston via Elizabeth Craft Designs have released a whole new collection of dies at CHA and we can choose which ever dies we want to show off this month. I have chosen the CUP POP STAND for my first card. Tomorrows card yet undecided!! Typical last minute.com but I have been really trying to get ahead but just got too many things to fit in :)
Above is a bit closer to see the cup and spoon in all its glory.
The flower is an old paper flower had for YEARS!
The PERFECT TEA was a stamp that I have designed for my own use
and made with the MINT machine.
These pop stand cards fold out totally flat with the center piece standing up inside.
Makes for a real WOW!
Here you can see I used the Paris edges to create the look of a doily.
Last but not least here is the outside of the card, I used Karens lovely
stamps You, me and Tea! That is sooooo me! I love my Cuppa
and whilst most will crave wine I love my cup of tea.
Here is the packing sample and as you can see it works perfectly well
for coffee as well!
Here are all the stamps from the Set.
Check out all the talented DT members on the Links on the left and check out
Karen Burnistons blog on Wednesday for her post.
All items will be arriving at Crafts U Love in the UK soon. I will post on blog when they are in stock.
Hi Crafters Its me again for Crazy 4 Challenges Blog and today it is a sketch challenge. I am really enjoying the challenges every week and I am trying to be more organised and not so last minute this year. So far so good... well a tiny bit better than usual.
Above you can see the challenge sketch that I had to follow. Of course this
is for inspiration and you can add your own sort of twists to it... least that what it what I have done.
I must say I am thrilled with how this card turned out.
The main image for this card is BAKER THE BEAVER... from Karen Burnison
Beaver I hear you say... ahh well BAKER THE BEAVER got a makeover and it so happens he makes FABULOUS squirrel too!
Super chuffed how he turned out. With scissors I cut his ears to a point, added a hand cut tail and used JOLLY THE MOUSE'S feet for my squirrel.
The base card was made using the large tag from Marianne Designs from their January release. I folded a piece of card and made sure the cut edge was inside the edge so it would not cut and hence make a folded card.
The wood panels were done using square with a wood stamp from Marianne.
Unless you've been under a rock you'd have heard that CHA is underway in America right now. All the biggest names in the Craft Industry are there showing off their new designs and tempting all the retailers in to purchase goodies in turn to tempt us mere crafting mortals :) Karen Burniston unveiled her first LOOK BOOK and its FREE, yep a free E book that you can even print if you want to with 10 projects complete with step by steps - that's one for every one on her Designer Challenge Team and yep that means me too :) Thrilled beyond words to be part of this Ebook and of course to be part of the Karen Burniston Team.
Doesn't it look beautiful and Karen did all the layout herself teaching herself a
whole new programme to get it done. Karen is the most awesome hands on
person, doesn't simply design and pass onto a swarm of people to promote for her
and I think that is why I admire her so much. So much of her love for the
product goes into everything .
You can peruse the book easily on a computer, phone or tablet at this link: Pop it Ups Cardmaking Winter 2016 If you'd like to download the book so you can print it, choose the "Share" button and then choose "Download". Issuu also has a free mobile app if you prefer.
Also I was lucky enough, entirely by chance to hear a strange sound on my phone which told me I had a live Periscope Broadcast and it was Karen broadcasting LIVE from CHA.
This will remain online for just 24 hours from when it was broadcast, so its not that long left but the link to view Karen quickly take you around their booth is here.
It was exciting to hear Karen say "Oh there Stampingcaz" right at the beginning and to see fellow designer challenge friend Kelly Booth waving, It was live, I felt like I was there :)
As at 8;30am in UK it says it has 8 hours left on-line
Hi there Second week on the Crazy 4 Challenges blog and this weeks theme is BUBBLES. This could be bubble bath, blowing bubbles, well anything you associate with Bubbles. I chose to use a cute Penny Black stamp set featuring two little mice sharing a "BUBBLY LEMONADE".
Here you can see the cute little micey from the Penny Black stamp set called "Homemade"
For the main card base I used the Karen Burniston TAGS PIVOT die set which makes for a super simple WOW card. I used the NEW Karen Burniston PULL CARD EDGES to make the RIC RAC.
The Tags Pivot is available from Crafts U Love at www.craftsulove.co,uk
and the PULL CARD EDGES is coming soon to Crafts U Love as this is a NEW RELEASE from
Karen Burniston that is being showcased at CHA this weekend.
You may remember a little while ago I made the MAKING MEMORIES stamp and I said I would show you how I used it. Not only have I recently used this in my Nieces 21st Album I of course used it on the Memory Jar. I wrapped twine around the top and very simply decorated with buttons and flowers I thought would go well with the decor in my front room. Which includes green, blue and pink. I've got such a pretty new wallpaper in the room now thanks to my husband who hung the paper this past Christmas holiday. Thanks Darren! you are a keeper :) Not least for hanging it but letting my have a really pretty wallpaper in the main room of downstairs.
The picture above is the AFTER with my tag and flowers :)
Here is the BEFORE and also my lovely lovely wallpaper ;)
So far 3 little memories to make me smile. I can not wait to read all these on New Years eve in 2016, but first to make lots of memories!
Love being able to really personalise cards, especially when its for kids as they love it. Caiden is going to a friends birthday sleepover this weekend and their favourite super hero is apparently THE GREEN LANTERN. Also LOVES Lego so I thought I would make it a lego/Lantern card. Simple front showing of the DOUBLE FIGURES!! its a big deal to reach those doubles :)
Inside you can see the Lantern is all set to wish
a Happy Birthday with BOOM! BANG! POP! and a cake :)
It was my nieces 21st Birthday yesterday and I made her this fun card. Front of the card is super simple with BUSTER the dog taking center stage. The inside of the card I have used the NEW COMING SOON Karen Burniston CAKE POP UP die set.
All the new die are on order and will be at
Crafts U Love soon
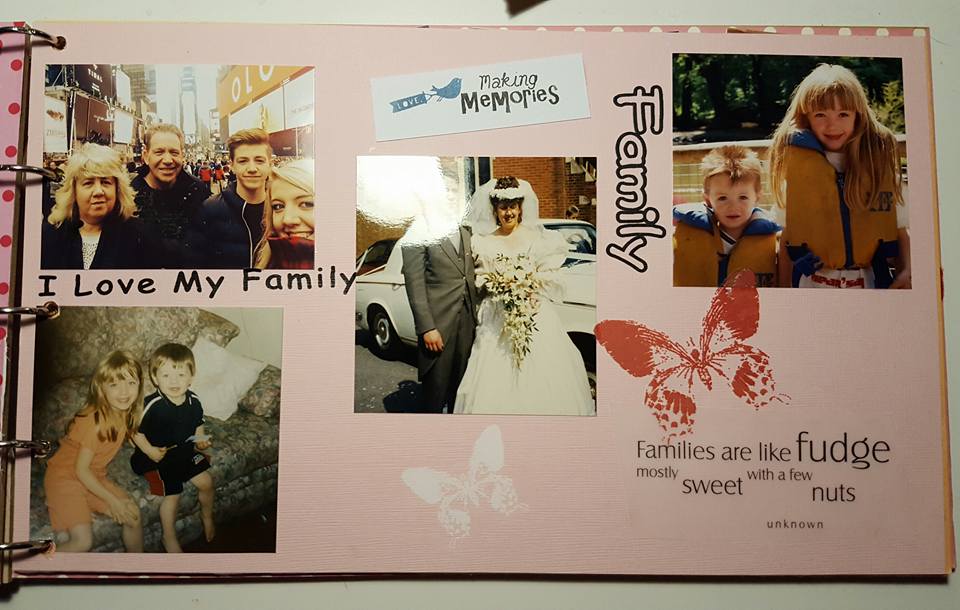
As well as this card I also made her an album full of photos of her growing up.
Precious Memories I hope for her and glad she liked it.
Here are a few of the pages.
I am off in the shed tonight to work on my next challenge card, trying this year to get ahead
with things and not be so last minute. So far, so good :)
Hi Crafters, I am back with a Silhouette Mint picture post. I will do a video when I can but at the moment with the kids off school its too noisy to do it. The Silhouette Mint is a fabby little stamp machine that can make stamps in 7 sizes. The smallest is 15mm x 15mm and the largest is 45mm x 90mm This is what they say : The Silhouette Mint™ is the most innovative and powerful custom stamping system on earth. The machine’s special “thermal printing” ability lets you create 3D reliefs of custom designs on Mint stamp sheets. Simply apply Mint inks to your stamp and you are ready to roll. Stamp up to 50 times before reapplying your Mint ink. Design it, Mint it, ink it, stamp it. To create a stamp you will need the following : Mint Machine and software on a PC Mint Inks Mint Stamp Kit and an idea! First up let me tell you about the accessories that you will receive with the starter kit. You will receive the machine, 4 mint Inks in Black, Red, Blue and Yellow and two STAMP KITS in 15mm x 60mm and 30mm x 30mm , Software and Instructions and leads. The Stamp kits comprises of
WOODEN BLOCK,
a Stamp Sheet (that can be used once to make one stamp)
a couple of stickers to stamp you finished stamp onto it,
a stamp cover to keep the stamp dust free and free from drying up. The stamp sheet is encased in card and once you have made your stamp you tear your stamp out and stick it onto the interchangeable stamp mount.
This stamp mount clicks on and off the wooden block. So once you have that particular wooden block you need never get another one of that size. You would only need to buy replacement stamp sheets which come in packs of 2.
Prices of the STAMP KIT for the 15mmx 30mm is £11.99, this is the price for one stamp, however, now you have that particular block size you would not need to get another. STAMP SHEETS which are £11.99 for TWO sheets - £6 for a fully personalised stamp is really not bad.
There are 15 colours in total in the Mint Inks - Prices for a bottle are £5.49 each
First up you design the stamp in the Mint Software, start by selecting the size of the stamp that you want to make. I have used a mixture of a font and a graphic
from the Silhouette Store.
Once you have designed the stamp you click MINT leaf which
will convert the image, It will flip the design itself, check and double check your
image looks ok. Once you have made the stamp its too late, you can't change anything!
In there a designer software there are options to change the graphic so play around with this to get the effect you are after.
(here you can see the stamp sheet stuck onto the interchangeable mount and the lid)
Once you are ready to make the stamp, select the SEND TO MINT and the
light on the machine will begin to blink.
Insert the correct size stamp sheet according to the size you were designing.
When it comes out it will look kinda flat, you'll see where the image has been
thermally placed on the sheet and probably like me you will look and think "How the heck will this work". But I promise you it will work!!
(Here you can see the stamp sheet and interchangeable mount clicked into place on the wooden block)
Using the special formulated MINT INKS place the ink using the fine nozzles
where you want the ink to be. Carefully. The ink is special in that it is thicker
thank normal inks. It will absorb into the stamp. You need to wait approx. 5 to 10 minutes
for the ink to absorb and the stamp to be ready.
Here you can see the first image I printed was the bottom one and it took approx. 9
stamps before the image was clean and ready to use. This can now be used up to 50
times. Of course it will be a lot lighter the nearer to 50 you get, so it might be
that you want it to remain darker and you might just get 30 images out of it.
Once the ink is out, simply re ink. This can be with the same colours or different ones.
Here you can see the detail that this stamp machine can pick up
Look at that birds little legs!
Here is a selection of stamps that I have made.
The with Love one was a lifesaver during Christmas cards. It will be ready for Christmas next year or anything I need to write this on!
I simply scanned my writing and uploaded to the software.
I have also made this one for my Mum for Christmas
Of course for this one as I was giving to someone else I had to buy a
STAMP KIT with the WOODEN BLOCK and also an ink so Mum could re ink her stamp.
I think you can safely say I LOVE THIS MACHINE - whenever I feel I need a stamp
for whatever reason within minutes of designing it I can have one ready and inking.
HANDY HINT When working out which stamps I needed first I drew the sizes on a piece of paper to give me a visual and work out which ones I would use most. I must say the 2 sizes that come with the machine are probably the most useful.
Crafts U Love www.craftsulove.co.uk have the starter kits
they also have all the accessories on order so they will hopefully
be arriving soon.
I am finishing off the project I made the stamp for so I will add that picture to this post later after we have had our tea. I will also try and shoot a video later in the week.
Here is a very quick video showing you how I sent it from the software to the machine.
thanks to the very lovely Frances Brynes invitation who is this months hostess.
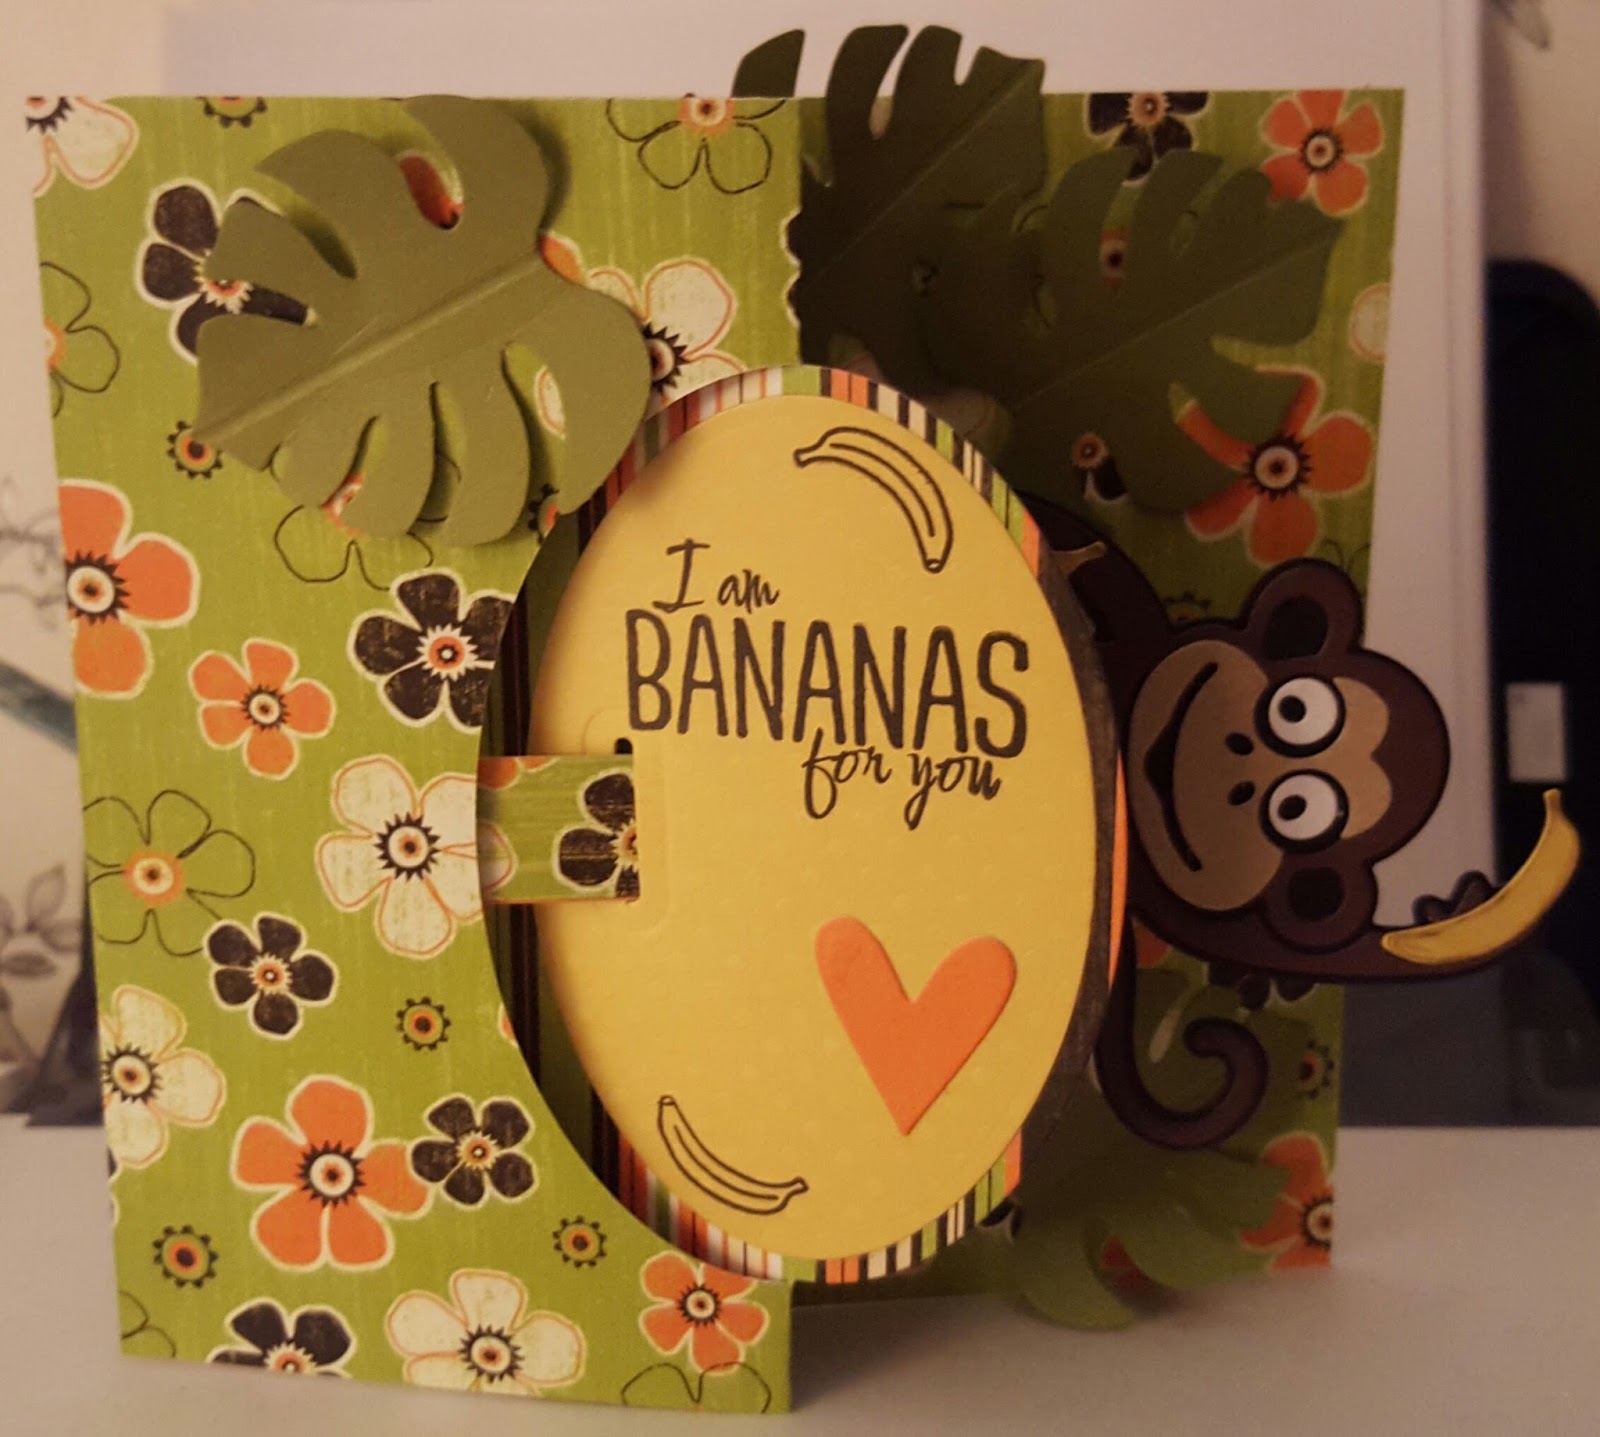
Apparently yesterday was Z Day. So let's celebrate by including something starting with the letter Z on our cards. You could make a Z Fold Card, use a zip or zip image, zinnia, zebra, zoo etc. Let's show the letter Z how much we love it!
So I decided to play with the new Karen Burniston Oval Pull card. All the Pull cards
are fabulous and happen to create the "Z" style card. Teamed with Mr Jinks (OK just Jinks) from Karen Burniston her new adorable Monkey and it a cute/fun card.
The Oval Pull card comes with an optional "Pull" which have attached Jinks to.
Here you can see the card flat and all the detail.
The paper was an VERY old Bo Bunny paper which I found in a box, perfect
colours for a monkey card.
You can position your piece onto the pull part in the way you want, I chose to position Jinks
so you could just see his head when closed.
Here is the last picture and you can see when the card is opened
Jinks has moved all the way to the centre, I love the way his legs
move with him into the centre of the card really give him animation.
Here to can see the card standing from above, ahem, backwards Z here too :)
The New Karen Burniston are out later this month, being showcased at CHA very very soon. Crafts U Love in the UK have these on Pre Order. www.craftsulove.co.uk
I will be back next Saturday with my next Crazy for Challenges and thank you to Frances for the invitation.
Materials Used : Jinks Karen Burniston, Oval Pull card Karen Burniston, Woodware Jungle Lead Punch, Bo Bunny paper (very old), Cheeky Monkey Clear Stamp set Karen Burniston.