
Showing posts with label Tutorial. Show all posts
Showing posts with label Tutorial. Show all posts
Friday, February 6
Tuesday, December 2
Sunday, February 17
Candle Tutorial
I had a few people asked so I just did this quickly this afternoon. Its very simple. You will need
HOW TO


* Candle
* Stamps
* Ink (I used Staz on)
* Colouring medium - I have used Watercolour Pencils, H20's, Watercolour Crayons, Distress Inks before
* Tissue Paper
* Greaseproof paper
* Heat Gun
* Scissors
HOW TO
Stamp image onto tissue paper using a waterproof ink such as Staz on, Archival, Memories

Colour image in with chosen colouring medium. I have in this instance used Watercolour pencils and an aqua brush. The following two pictures are of what I have coloured and then the paper underneath. This is just showing you how the tissue absorbs the colour. DO NOT move the tissue about when colouring as it might transfer back up through the tissue.


Cut around image, you dont have to be too precise, just taking the excess away. Place onto candle and take a piece of greaseproof paper,wrap around the candle and scrunch up around the back and hold tight around candle. Here is a picture of the greaseproof paper held tightly. I didnt show my hand as it looked horrible!! LOL I need a model hand for these pictures, mine are looking too old!


Take your heat gun and hold approx 2 inches away from candle and whislt holding it I wiggle it a little, not too much, but a little so its not held totally on one part of the candle.

This last picture is after I have heated part of the candle. If you look closely you can just about see from his eye and to the left it looks slightly brighter. This happens has the tissue gets absorbed into the candle. When that happens all over your candle is done.
If you take the greaseproof off before its ready you can replace the greaseproof and heat again with no problems.
I will finish this candle off later. We have treated ourselves to a movie on demand! Very rarely do it, I mean like once or twice a year. We have got Transformers :) Should be fun.
Laters
Cazx
Wednesday, January 2
Watercolour Pencils Tutorial
OK I dont profess to being an expert by any stretch of imagination, and I have seen many others who do beautiful colouring, however I have had a few people ask in the past and its one thing people comment on for my cards so I decided to make a little tutorial for how I colour. I have been working on and off all day on a wordpress blog, but its really doing my head in and just doesnt seem as simple as blogspot, its a shame as I love some aspects of it, but for my I will stay here.
OK these photos were taken by myself whislt trying to colour in too and they were on my camera phone with poor lighting but I hope these will give you a few ideas. Make sure your pencils are sharp, this will prevent the wood of the pencil getting wet.


 Step Three - Using the waterbrush draw the outside of the colour in to cover the area. You need to make sure that the darker lines remain around the edge and that it has light and dark tones.


 I have coloured the wings, star and cheeks with the same technique by taking the colour off the pencil and using it like paint.
  Here is the finished Edwin. I will add to a card/creation tomorrow kids permitting.
First things first….. tools… my preferred pencils are Albrecht Durer by Faber Castell - the colours are beautiful, the leads rich and thick. I also prefer to use an aqua brush and I use the ones with the valves inside. Watercolour paper of course gives great results but I also like the texture of the linen card from Crafts Central in the Paper cellar pick and mix. For my ink I prefer the black versafine ink.
OK these photos were taken by myself whislt trying to colour in too and they were on my camera phone with poor lighting but I hope these will give you a few ideas. Make sure your pencils are sharp, this will prevent the wood of the pencil getting wet.

Step One : Stamp images onto cardstock

Step Two : I have coloured the edge of his trousers with a dark blue. Place the colour where on the image you want the picture to be darker.
 Step Three - Using the waterbrush draw the outside of the colour in to cover the area. You need to make sure that the darker lines remain around the edge and that it has light and dark tones.
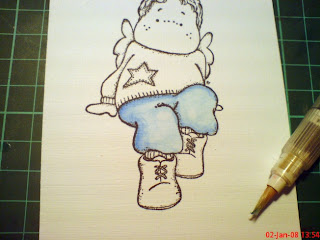
Step Four - Again doing the same thing I have coloured Edwins jumper with red pencil.

Step Six - again I have coloured the jumper and the shoes too.
I have added colour to the face and hands by taking the colour off the end of the pencil and colouring directly onto the card.
 I have coloured the wings, star and cheeks with the same technique by taking the colour off the pencil and using it like paint.
Then I have taken a dark brown pencil and drawn directly onto the image where shown, around his jumper, parts of his wings, trousers and shoes. I have then used the waterbrush on these brown lines and this gives a great shaded effect. I believe the brown I used for this was called nougat.
 Here is the finished Edwin. I will add to a card/creation tomorrow kids permitting.
I hope thi might have helped a few people out.
Thursday, October 4
Expression Tutorial
OK, this is a bad tutorial, but I was in such a rush for a few reasons, 1/ both boys were asleep and 2/ my camera batteries about to die!


Paula (see UK blog list) showed me the other day how to make a 6 x 6 envelope using the Cricut Expression machine using a piece of 12 x 12 card and the 12 x 24 mat. Ordinarily you can not make a 6 x 6 out of a 12 x 12 but with this clever paper placement you can.
You will need
1/ Expressions Machine - Crafts U Love is a great place for them
2/ 12 x 24 Mat - Again you can get these from Crafts U Love
3/ Piece of 12 x 24 paper if possible
4/ 12 x 12 paper
5/ Plantin Schoolbook cartridge that came with your expression.
OK for starters Paula suggests cutting the envelope on the big mat with a piece of 12 x 24 - this just helps with the placement of the paper, but you should be able to judge the placement even from these bad photos.
So here I have cut the envelope. 12 x 24 mat must be selection, FIT TO PAGE, ROLY POLY function - here we have a 6 x 6 (just over) envelope
Take the green away. You can either now use the outside of the cut out as a guide for the paper or as I did I looked at the mat where the image has just scratched the outline of the envelope and place the paper. I will draw some lines with a permanent pen to show me where I place the paper for next time, not across the whole mat, just the very top and the side bits where it is not sticky.
Now you need to cut the side that are overlapping away. I very crudely did it in the next picture and I stuck the mat in the machine.

Now remember to tell your machine you have 12 x 24 mat in there and let it assume there is a full sheet of paper. FIT TO PAGE, ROLY POLY. and you will get a 6 x 6 or very close (slightly bigger) envelope.

Thanks to Paula for experimenting with, I would have never thought to do this but am so pleased she did as 6x6 is my preferred card size. BTW Paula your directions home were fab, lot more straight forward than they way I got there!! :0) Hope the boys didnt leave you with too much tidying and WOW your studio is lovely, no scrap that, your house is lovely!
Tuesday, July 31
"Cuttlebug - over the edge" tutorial
A few people have asked how I did it, I know its hard to explain in words sometimes so here are some visuals for you.
 Step one - Take image, remember when you trim it you need to leave a gap to be able to emboss. Pop in into the cuttlebug folder so most of the image is sticking out.

Step Two - Place embossing folder into the sandwich as shown. Note the long side of the embossing folder is going with the short side of the blocks.
 Step Three - Run though cuttlebug machine
 Step Four - Voila! here is your cuttlebugged "over the edge" design. Embellish as required. You could ink the edge, colour with inks or pencils, whatever you wanted.
I'll finish this card off tonight and show you what I have done with it.
Step one - Take image, remember when you trim it you need to leave a gap to be able to emboss. Pop in into the cuttlebug folder so most of the image is sticking out.
Step Two - Place embossing folder into the sandwich as shown. Note the long side of the embossing folder is going with the short side of the blocks.
 Step Three - Run though cuttlebug machine
 Step Four - Voila! here is your cuttlebugged "over the edge" design. Embellish as required. You could ink the edge, colour with inks or pencils, whatever you wanted.
I'll finish this card off tonight and show you what I have done with it.
Subscribe to:
Posts (Atom)